Home, Family, Cooking, and Education

Showing posts with label Holiday Treats and Foods. Show all posts

Thursday, October 24, 2013

Tarantula Cake


In honor of the traditional Cake Walk that occurs during one or two Halloween Carnivals this time of year, I wanted to donate a cake for those kids who enjoy both the spooky and sweet part of this holiday. I had a lot of fun creating this cake. I basically took a photo of a Tarantula and went to work. I admit, it still looks animated more than realistic but hey, it was my first try. My nephew actually thought I was creating one of the spiders that is on the game Mind Craft, but I needed to put a few more red eyes. This was all for fun really, so I thought I would tell you all how I did it.

 Hope you enjoy!


You can use any cake recipe you'd like and make it in a bunt pan. I like to use this quick and easy recipe that I got from my friend Stephanie Ashcraft, who is the author of 
"101 things to do with a Cake Mix":

Death By Chocolate Cake
Ingredients:
3/4 cup Sour Cream (I like to use all natural whole)
4 eggs
1/2 cup of water
1/2 cup of oil (I use light Olive Oil or Canola)
1 chocolate cake mix (It works with Gluten-Free also)
1 small box of instant chocolate pudding ( I like to use Trader Joe's Instant Chocolate Pudding)
1 cup of chocolate chips (it recommends semisweet but, I went with milk chocolate this time)

Directions:
Pre-heat oven @ 350 degrees
Beat sour cream, eggs, water, and oil together in large bowl until thoroughly mixed. Add cake mix and pudding mix. Stir in chocolate chips.
For a bunt cake:
Place batter in a greased and floured bunt pan. Bake for 45-55 minutes, or until a fork inserted into cake comes out clean.


While the cake is cooling, start the rice crispy mix. You can make this anyway you'd like. I like to do mine on the stove top. For the this way of making rice crispy mix, click here.


Because I was taking this to a party, I folded some aluminum foil over a sturdy piece of cardboard for my cake plate.

After the cake cools, dig out the middle so that you have enough to fill it with a ball of rice crispy mix.


Make another ball for the head. To support the head, I used a bamboo skewer.


I'd like to say that you could use any kind of frosting, but I have come across recipes that are meant for cookies rather than cakes because they are not as strong. So, if it is a cake-like frosting, you are in business.

I used the Better Homes and Garden Frosting listed below for the frosting:

Ingredients:
1 cup shortening (I normally don't use Shortening, but in my experience, it is easy to work with when molding) 
1 1/2 teaspoons vanilla (Use clear Vanilla for a whiter frosting)
1/2 teaspoon of almond extract
4 1/2 cups sifted powdered sugar (about 1 pound)
3 - 4 tablespoons milk

Directions:
In a medium mixing bowl beat shortening, vanilla, and extract with an electric mixer on medium speed for 30 seconds. Slowly add half of the powdered sugar, beating well. Add 2 tablespoons of the milk. Gradually beat in remaining powdered sugar and enough remaining milk to reach spreading consistency. Makes about 3 cups.


  1. I frosted the rice crispy mix first with my fingers that were wet with water. That way I could mold the frosting all over while creating a body for my tarantula. Yes, the body of the tarantula looks yellow compared to the frosting on the cake. I had some leftover butter cream frosting I used in this photo. 
  2. Then, I frosted the cake with the white frosting. 
  3. Next, I created the tarantula's black body by adding a few drops of black food coloring* to the rest of the icing, along with a half case of crushed Oreo crumbs.This created a lumpy texture to the frosting. With wet fingers again, I molded the black lumpy clay-like frosting all over the body and molded legs by rolling them out and pressing them into the body and white frosting to attach them.  
*If you don't have black food coloring, I have used blue food coloring and added cocoa powder to make it a black'ish chocolate frosting. Plus the Oreos help with the color too.

For the details on the tarantula, I took Hot Jaw Breakers for eyes and candy corns to look like fangs. The finished result (in the photo at the top of this post) I added some molded pedipalps out of the black frosting to surround the fangs.  

Finally, I sprinkled some black sprinkles to resemble a harrier specimen. I should have done that to the legs as well.

Happy Halloween Everyone!


Print Friendly and PDF

Wednesday, October 9, 2013

Pumpkin Rice Cereal Treats

Pumpkin Rice Cereal Treats

This is an easy 15 minute project and it made 28 pumpkins. Great for school parties!


Supplies: rice cereal, mini marshmallows, butter, food coloring (red/yellow), green candy for stems (I used Jelly Bellies) and cupcake papers, if desired.


Make a batch of Rice Krispie (R) treats. My basic recipe: microwave 1/4 c. (1/2 stick) of butter until melted. Add 4 c. mini marshmallows, stir and microwave until those are melted (stir intermittently). Add food coloring to make a bright orange - remember it will be "diluted" with the cereal so go bright. Add 5 c. of rice cereal and stir well.

To make the pumpkins: set out wax paper and get your handy-dandy scoop (I used the Pampered Chef large). Spray some Pam (R) on the scoop and scoop out individual balls onto wax paper. Try to pack the mixture into the scoop so it stays together, but don't worry if they fall apart a bit. When all mixture is scooped, spray your (clean) hands with Pam and mold the pumpkins into tight rounds and place into cupcake papers. Make a small divot in the center. Add a jelly bean for stem to finish. Viola! Easy peasy and cute to boot.

Mangia! (Eat!) . . . Cindy Lou Who
Print Friendly and PDF

Friday, April 6, 2012

Fun Easter Ideas


Photo by Madeline


Photo from weheartit.com

Photo by Madeline L.


Photo from thoughfullysimple.com

Photo by Madeline L.

photo by justjennrecipes.com
Photo by Madeline L.
photo from thecraftingchicks.com
Photo from Nichole H.

photo from weightwatchers.com


Photo by Heather C.

photo from allyou.com


Have a Happy Easter!

from Saltbox House Cooking Exchange
Print Friendly and PDF

Friday, March 2, 2012

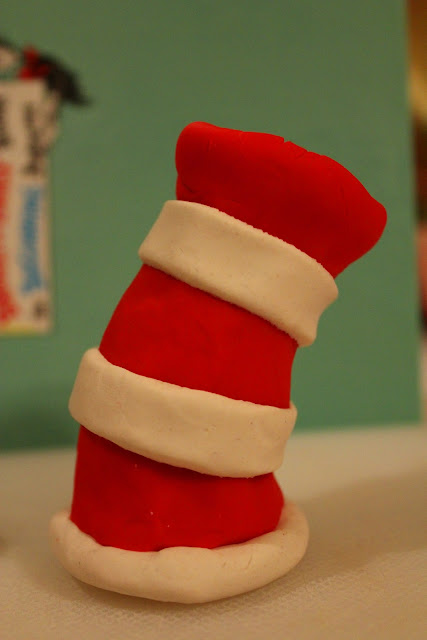
Dr. Seuss Treat Toppers

Photo from Madeline L.

Happy Birthday Dr.Seuss!

This day is a very special day for all children book fans alike. Whether we read them to our children, to ourselves, or simply admire our vintage collections, there is something to celebrate in the name of Dr. Seuss. This legendary children's author, poet, and cartoonist, brought his world to life with favorite stories such as the Cat in the Hat, Green Eggs and Ham, How the Grinch Stole Christmas, and the Lorax (which debuts in theaters today!)

So many celebrations are already in place for this very special day. Celebrations such as Read across America, Pajama Day at local schools, and visiting the Dr. Seuss Memorial in his birth place of Springfield, Massachusetts visit www.catinthehat.org.

So why not take this day to celebrate a very special person who is not only remembered in our childhood past time, but will be in our children's childhood past time for years to come.

Photo from Madeline L.

Here at Saltbox House, we would like to share some fun ideas for treat toppers. These can be put on top of anything from cupcakes to rice crispy treats and made into anything from cake pops to cookies. If you make these from softened candies, you can make them into suckers as well.

Here is some things we recommend for making these edible treats:
  • Fondant or try Marshmallow Fondant For Tara's Marshmallow recipe click here
  • Marzipan
  • Softened colored Tootsie Rolls, Air Heads, Starburst, Taffy, etc.
  • *Edible Play dough
  • *Marshmallow putty
*Some of these recipes we do not have on this blog, yet. We hope to get these on here as we make them.

The best way to practice, is to use play dough!

Photo from Madeline L.

The Cat in the Hat's Hat

Comparison photo from Madeline L.


One of my favorite books
(I can see this made into a regular cake to look like the book).


Photo from Madeline L.

One Fish

photo from Madeline L.

Two of These Fish

Photo from Madeline L.

Red Fish

Photo from Madeline L.

Or this Blue Fish


 With so many characters to create, it is no wonder we can keep creating fun ideas for every day!

"From there to here, and here to there, funny things are everywhere."
- Dr. Seuss
Print Friendly and PDF

Thursday, February 2, 2012

I Heart Foods

Get Creative this month!

photo from pinchmysalt.com

photo from about.com


photo from walmart.com

photo from cutestfood.com

photo from makeandtakes.com

photo from molempire.com

photo from geniouscook.com

photo from slice.serioueats.com

photo from dianadessersts.com

photo from vegnews.com


photo by Amanda D.


Photo by Amanda D.


Photo by Madeline L.


Photo by Heather B.


Photo by Abby R.

Print Friendly and PDF

Monday, September 26, 2011

gluten free pumpkin chocolate chip bread.

I used this recipe that I got from the Food Network  http://www.foodnetwork.com/recipes/pumpkin-bread-recipe/index.html

I replaced the flour with the gluten free all-purpose flour found here http://saltboxhouse.blogspot.com/2011/09/gluten-free-all-purpose-flour.html

Oh and of course I added chocolate chips :)   For some reason I had to end up baking it for about 30 minutes longer, I kept checking and adding time.


Ingredients

  • 3 cups sugar
  • 1 cup vegetable oil
  • 4 eggs, lightly bean
  • 16 ounces canned unsweetened pumpkin
  • 3 1/2 cups flour
  • 2 teaspoons salt
  • 2 teaspoons baking soda
  • 1 teaspoon baking powder
  • 1 teaspoon nutmeg
  • 1 teaspoon allspice
  • 1 teaspoon cinnamon
  • 1/2 teaspoon cloves
  • 2/3 cup water

Directions

Preheat oven to 350 degrees. Butter and flour 2 9 by 5 loaf pans. Stir together sugar and oil. Stir in eggs and pumpkin. Combine dry ingredients in separate bowl. Blend dry ingredients and water into wet mixture, alternating. Divide batter between two loaf pans. Bake for 30 to 40 minutes or until cake tester comes out clean. Let stand 10 minutes. Remove from pans and cool.


Print Friendly and PDF

Friday, July 15, 2011

For all you Harry Potter nerds out there!

I couldn't help posting these links. Sorry, I haven't made these but they looked like fun and I am a true Harry Potter fan so good luck!

Butterbeer Cupcakes

Cauldron Cakes

Butterbeer 1

Butterbeer 2

Pumpkin Pasties

Ton Tongue Toffee


I'm sure if you do more searching the possibilities are endless but I thought this was fun. :)
Print Friendly and PDF

Sunday, February 13, 2011

Heart Dogs

Something fun for your little Valentine's.
Cut the ends from hot dog at a diagonal and place the cut edges together as shown. Spear the heart with two tooth picks. Add piece of cheese trimmed to resemble the end of an arrow.
I saw a variation of this in the February edition of Family Fun magazine. My kids LOVED it and its so simple. Happy Valentine's Day!


Print Friendly and PDF

Wednesday, November 24, 2010

Confident and scared


This picture was taken during an intense Toy Story 3 moment. I don't have any food related pictures to post!
Due to the bad roads my family will not be eating with me this Thanksgiving BUT.... I am CONFIDENT I can make some thing yummy because my guru, my idol, the person I want to be, Pioneer woman was on Throwdown with Bobby Flay and inspired me to try lots of new things!

Besides the usual here are some of her recipes I will (am currently) making:


That's A LOT of new stuff and I'm scared. But I can do it! Also, I've made the Apple pie before but the recipe is so goooooooood I had to post it. Happy Thanksgiving!
Print Friendly and PDF

Online Cooking Classes

Online Cooking Classes
Click here for more information